Cloud Foundry
by HEIG-Cloud
Tags:Posted on Mon, Feb 15, 2016
What is Cloud Foundry?
Cloud Foundry is a PaaS provider. It is currently developped by many groups, mainly Pivotal but also Swisscom. A PaaS allows developpers to deploy web application very quickly and painlessly. How painless? Well, not much more than one command, maybe two or three depending on the needs and the difficulty of the application. Say a user wants to push a JS app that only writes “Hello World”, here is how he does it on Cloud Foundry:
cf push app.js
And that’s all, really. Once the user is logged, he only needs to make simple calls like this. How does he delete his app? Same thing really.
cf delete app.js
The only need thing you need is the cf-cli (cf meaning cloud foundry of course).
Why use a PaaS
A PaaS allows developpers to deploy web applications very easily, without the need to configure an environment (server, db, etc.). It takes care of creating routes, creates new instances when the load increases and it’s all transparent to the user. A few PaaS exists now, among them, Google App Engine, Cloud Foundry and Heroku. Cloud Foundry is open-source, and since it’s the only one, a lot of people and groups contribute to the project. There are now many providers, like Pivotal, IBM and even Swisscom. Just remember the following, a PaaS allows developpers to work subsequently faster.
Cloud Foundry
You probably guessed it, we have deployed Cloud Foundry. There are a few (good) reasons for that. Let’s see how it’s possible to use CF and why it’s advantageous:
- Deploying Cloud Foundry on a private cloud
- You have full control over your CF deployment. You can make any arrangements necessary and your sensible data is safe.
- Deploying Cloud Foundry on a public cloud
- You have a certain control over your deployment, mainly over the CF stack itself, you can change and tune things according to your needs.
- Deploying Cloud Foundry on an existing provider
- You have the ability to deploy your apps on a tested and functional environment. You have minimal control over the deployment since you are nothing more than a simple user.
No matter the solution you pick, your code will work on either one of those, so you can avoid any vendor lock you would have otherwise. This is one of the main reasons why CF is so appreciated and used.
What we want from it?
This CF deployment could allow students to work with it, to test their web apps. At the moment, they learn to work with Heroku, which is also a powerful well-known PaaS but as previously stated, is vendor specific. It becomes quite hard to change things or to be compatible with other technologies.
It’s also a good way to test our OpenStack deployment, as CF needs some very specific configuration to work on top of it. We now have a PaaS and a spark cluster on top of our private cloud, plus a fair number of instances, with various applications installed.
How to deploy Cloud Foundry?
There are a few ways to deploy it, the most used one is to use BOSH. BOSH is used to deploy distibuted systems, you give it a deployment manifest and it will create your machine. In a classical BOSH CF deployment, there are two phases:
- Creating the director with BOSH
- Creating the CF architecture
Both theses steps require a manifest file that will be used to create the instances. The manifest will define the state of each host and how it should be configured. Let’s take a look at the director first.
Deploy the director with BOSH
A cloud foundry deployment usually comes in “two” parts, the director and the CF VMs. The director is the VM responsible for the creation of the CF cluster. When new machines need to be added, changes in the configuration or updates need to be made, the director is responsible for it.
The second part, which we will see more in details after, is composed of all the machines included in the CF cluster.
To deploy the director on OpenStack, you will need to follow these steps, from the bosh website: Initialize a BOSH environment on OpenStack. There are a few needed steps, like creating a keypair and a few security groups, then you need to create a manifest.
After creating the manifest, the director should be deployed on your OpenStack project. The manifest looks like this:
---
name: bosh

releases:
- name: bosh
  url: https://bosh.io/d/github.com/cloudfoundry/bosh?v=253
  sha1: 940956a23b642af3bb24b3cac37c4da746d6f9a9
- name: bosh-openstack-cpi
  url: https://bosh.io/d/github.com/cloudfoundry-incubator/bosh-openstack-cpi-release?v=21
  sha1: f28d30f0e20acbbf346f8d3fafcef05e3850c3d5

resource_pools:
- name: vms
  network: private
  stemcell:
    url: https://bosh.io/d/stemcells/bosh-openstack-kvm-ubuntu-trusty-go_agent?v=3012
    sha1: e92f3bd5081301652005bdc3dd11bff545a304ef
  cloud_properties:
    instance_type: m1.xlarge

disk_pools:
- name: disks
  disk_size: 20_000

networks:
- name: private
  type: manual
  subnets:
  - range: PRIVATE-CIDR # <--- Replace with a private subnet CIDR
    gateway: PRIVATE-GATEWAY-IP # <--- Replace with a private subnet's gateway
    dns: [DNS-IP] # <--- Replace with your DNS
    cloud_properties: {net_id: NETWORK-UUID} # <--- # Replace with private network UUID
- name: public
  type: vip

jobs:
- name: bosh
  instances: 1

  templates:
  - {name: nats, release: bosh}
  - {name: redis, release: bosh}
  - {name: postgres, release: bosh}
  - {name: blobstore, release: bosh}
  - {name: director, release: bosh}
  - {name: health_monitor, release: bosh}
  - {name: registry, release: bosh}
  - {name: openstack_cpi, release: bosh-openstack-cpi}

  resource_pool: vms
  persistent_disk_pool: disks

  networks:
  - name: private
    static_ips: [PRIVATE-IP] # <--- Replace with a private IP
    default: [dns, gateway]
  - name: public
    static_ips: [FLOATING-IP] # <--- Replace with a floating IP

  properties:
    nats:
      address: 127.0.0.1
      user: nats
      password: nats-password

    redis:
      listen_address: 127.0.0.1
      address: 127.0.0.1
      password: redis-password

    postgres: &db
      listen_address: 127.0.0.1
      host: 127.0.0.1
      user: postgres
      password: postgres-password
      database: bosh
      adapter: postgres

    registry:
      address: PRIVATE-IP # <--- Replace with a private IP
      host: PRIVATE-IP # <--- Replace with a private IP
      db: *db
      http: {user: admin, password: admin, port: 25777}
      username: admin
      password: admin
      port: 25777

    blobstore:
      address: PRIVATE-IP # <--- Replace with a private IP
      port: 25250
      provider: dav
      director: {user: director, password: director-password}
      agent: {user: agent, password: agent-password}

    director:
      address: 127.0.0.1
      name: my-bosh
      db: *db
      cpi_job: openstack_cpi
      max_threads: 3
      user_management:
        provider: local
        local:
          users:
          - {name: admin, password: admin}
          - {name: hm, password: hm-password}

    hm:
      director_account: {user: hm, password: hm-password}
      resurrector_enabled: true

    openstack: &openstack
      auth_url: IDENTITY-API-ENDPOINT # <--- Replace with OpenStack Identity API endpoint
      tenant: OPENSTACK-TENANT # <--- Replace with OpenStack tenant name
      username: OPENSTACK-USERNAME # <--- Replace with OpenStack username
      api_key: OPENSTACK-PASSWORD # <--- Replace with OpenStack password
      default_key_name: bosh
      default_security_groups: [bosh]

    agent: {mbus: "nats://nats:nats-password@PRIVATE-IP:4222"} # <--- Replace with a private IP

    ntp: &ntp [0.pool.ntp.org, 1.pool.ntp.org]

cloud_provider:
  template: {name: openstack_cpi, release: bosh-openstack-cpi}

  ssh_tunnel:
    host: FLOATING-IP # <--- Replace with a floating IP
    port: 22
    user: vcap
    private_key: ./bosh.pem # Path relative to this manifest file

  mbus: "https://mbus:mbus-password@FLOATING-IP:6868" # <--- Replace with a floating IP

  properties:
    openstack: *openstack
    agent: {mbus: "https://mbus:mbus-password@0.0.0.0:6868"}
    blobstore: {provider: local, path: /var/vcap/micro_bosh/data/cache}
    ntp: *ntp
You can initialize the manifest like this:
$ bosh-init deploy bosh.yml
You need the bosh-init cli to do this.
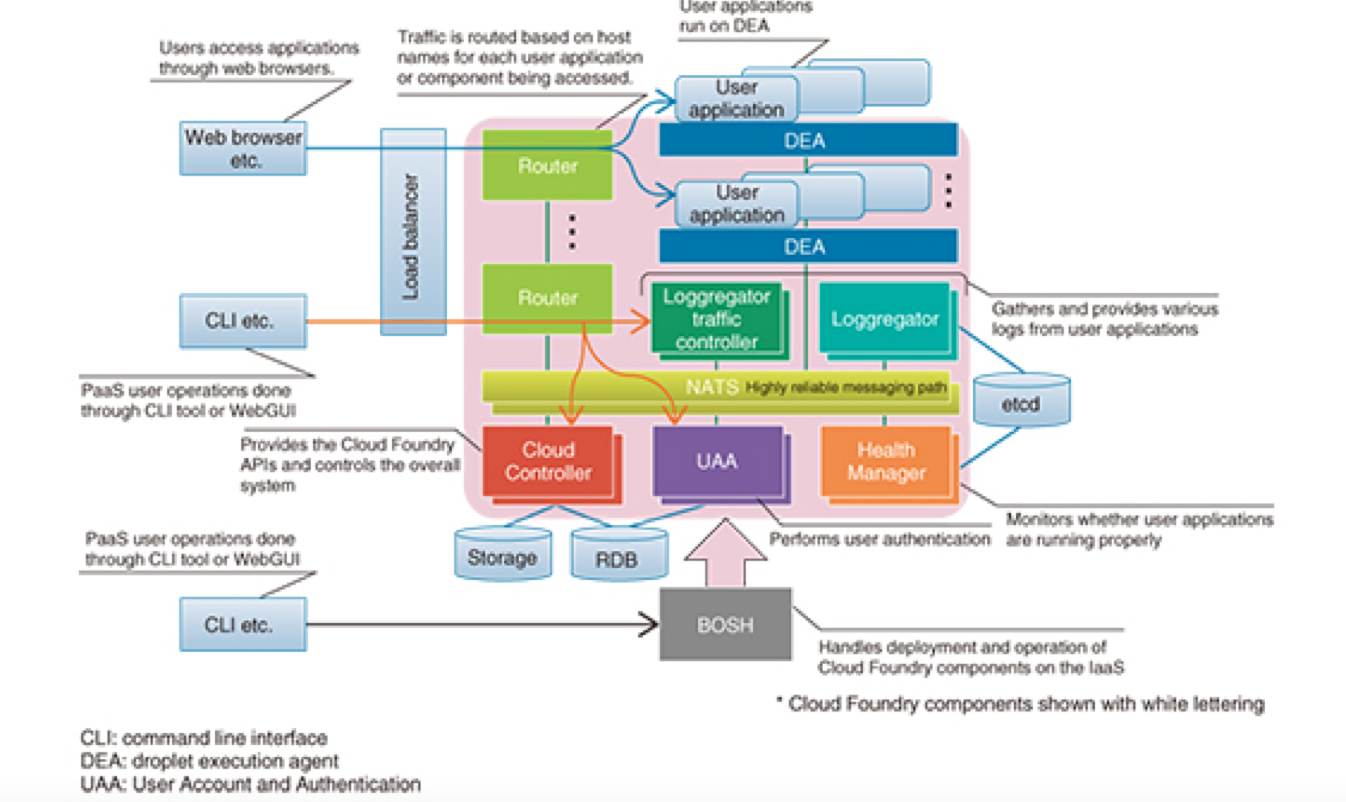
Deploy CF
The following image shows a basical deployment of CF: bootstrap the environment on OpenStack. There are different guides depending on your IaaS (AWS, OpenStack vSphere, etc.)